

Browse docs
On this page
Quickstart
Let's add a chat assistant to your app. We'll create an API key, install the SDK, add a token endpoint, mount the chat widget, and send a first message. Your dashboard's home page walks through the same steps, marks each one done, and shows when your first reply arrives.
You'll need an app with a backend. For self-hosting, complete Deploy first.
TIP: Using Cursor, Claude Code, or Codex? Choose Copy setup prompt on your dashboard's home page and paste it into your coding agent, or follow the coding-agent guide.
1. Create an API key
Your server signs chat tokens with this key. Sign up and create an organization, or join your team's. New organizations come with an agent that is ready to reply.
- Choose Create API key on your dashboard's home page, or open API keys.
- Copy the full key now. You won't see it again.
Add the key to your server's environment, then restart your server:
ASTRALBEAM_API_KEY=your_api_keyNOTE: Keep the key out of browser code and version control. Anyone with it can impersonate your organization's tenant users.
2. Install the SDK
npm install @astralbeam/sdkUsing Rails or a backend without a bundler? Skip this step and use the Script tag option in step 4.
3. Create the token endpoint
The widget calls POST /api/astralbeam/token to get a short-lived token for the signed-in user. Choose your backend:
import { createAstralBeamToken } from "@astralbeam/sdk/server"

export async function POST() {
  // The test IDs below are not authenticated, so this refuses production until you replace them
  if (process.env.NODE_ENV === "production") return new Response(null, { status: 401 })
  const token = await createAstralBeamToken({
    apiKey: process.env.ASTRALBEAM_API_KEY!,
    user: { id: "test-user" }, // Replace with the signed-in user's ID
    tenant: { id: "test-org" }, // Replace with the user's account or organization ID
  })
  return Response.json({ token }, { headers: { "Cache-Control": "no-store" } })
}
Don't use test IDs in production. Set user.id and tenant.id from your session, never the request body, as described in Identify your real users. For other languages, use the token format.
4. Mount the chat widget
Render the widget in a container with a set height:
"use client"

import { AstralBeamChat } from "@astralbeam/sdk/react"

export function Sidebar() {
  return (
    <aside style={{ height: "100dvh" }}>
      <AstralBeamChat apiUrl="https://astralbeam.ai/api" />
    </aside>
  )
}
For self-hosting, replace https://astralbeam.ai/api with your deployment's API URL, such as https://your-deployment.example/api. Your dashboard's guide fills it in for you.
Does your endpoint use another URL or headers, such as Rails' CSRF token? Pass fetchAstralBeamToken, as shown in Customize token requests.
5. Send your first message
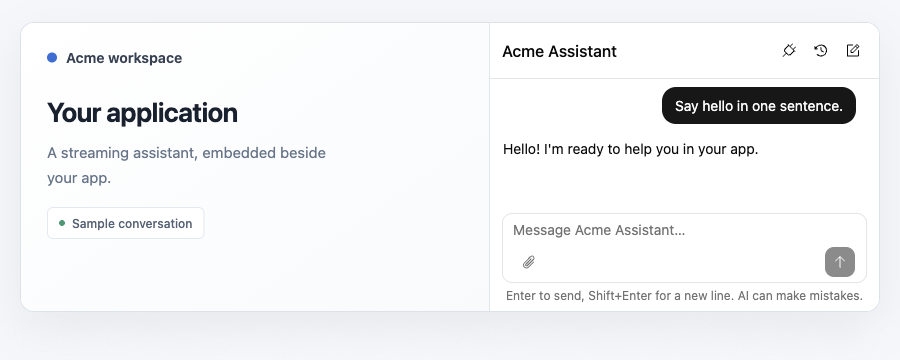
Open your app and send "Say hello in one sentence." A reply should stream into the chat, and your dashboard's guide shows that your app is connected.
If chat cannot connect, check the token endpoint in your browser's Network panel and follow authentication troubleshooting.
Customize your setup
With chat working, let's tune it for your app:
- Match your brand by setting the widget's title, colors, and theme.
- Add tools and widgets to let the assistant read and change your app's data.
- Shape your agent by editing its instructions, model, and tools.
- Connect model providers to add provider keys and choose the models your agents use.
- Add a sandbox to let agents run code and work with files.
- Connect MCP servers to give agents tools from external services.
- Review usage limits to cap tokens or spend for your organization, customers, and users.
- Invite teammates to add developers and viewers to your organization.
See every way to customize your setup, or follow the Todos tutorial to connect tools and live widgets. Read the security model before connecting production actions.